
Why This Ice Cream Cake Recipe is a Game-Changer
Ice cream cake is a versatile and crowd-pleasing dessert that’s perfect for any celebration. This no-bake dessert stands out for its customizable nature, allowing you to choose your favorite ice cream flavors and toppings. Whether you’re hosting a birthday party, holiday gathering, or casual get-together, this customizable ice cream cake is sure to impress. Its simplicity makes it beginner-friendly, while its presentation and taste rival gourmet creations. With just a few ingredients and minimal effort, you can create a dessert that’s both irresistible and memorable.
What You’ll Need to Make the Perfect Ice Cream Cake
To create the ultimate ice cream cake, gather these essentials: Two 1.5-quart cartons of ice cream (choose complementary flavors like chocolate and strawberry), crushed cookies (Oreos, Nutter Butters, or alternatives), homemade hot fudge (or store-bought with tips for improvement), and whipped cream topping (homemade vs. store-bought). Optional garnishes include sprinkles, chocolate shavings, or fresh fruit. Tools like a springform pan (9×3-inch or 10×3-inch), plastic wrap for easy removal, and an electric mixer for whipped cream are crucial for success. These carefully selected ingredients ensure a dessert that’s rich, flavorful, and utterly satisfying.

Step-by-Step Instructions for Making Your Ice Cream Cake
Prepping the Pan
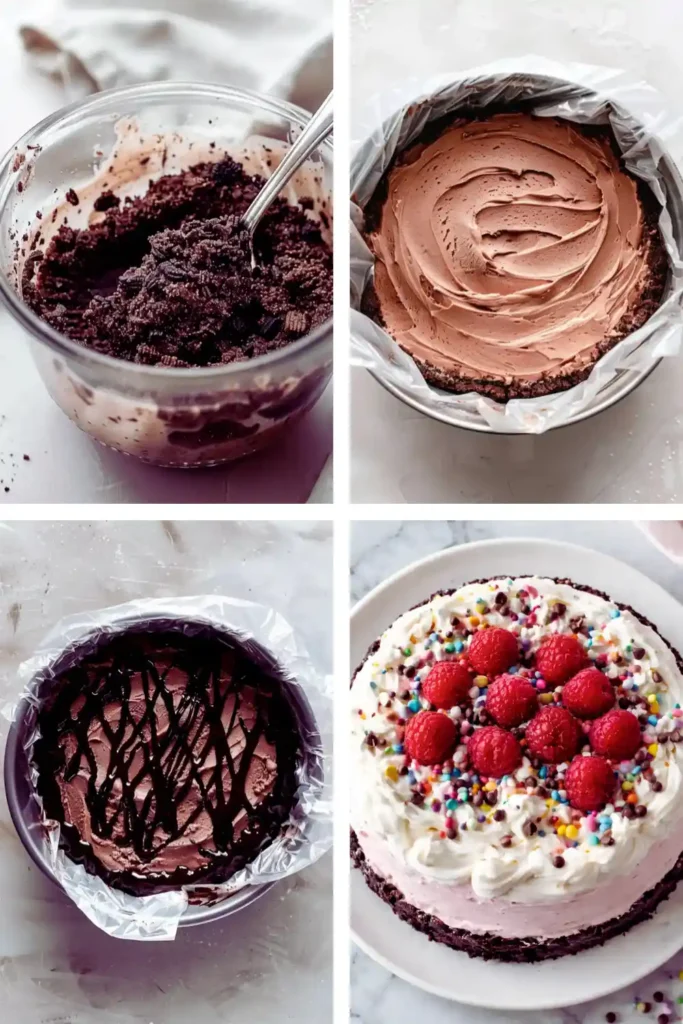
Start by lining your springform pan with plastic wrap, ensuring it hangs over the edges for easy release. This step is essential for cleanly unmolding the cake after freezing. Work in a cool environment to prevent the ice cream from melting during assembly. Tips for freezing layers include placing the pan on a flat surface in the freezer and avoiding stacking heavy items on top.
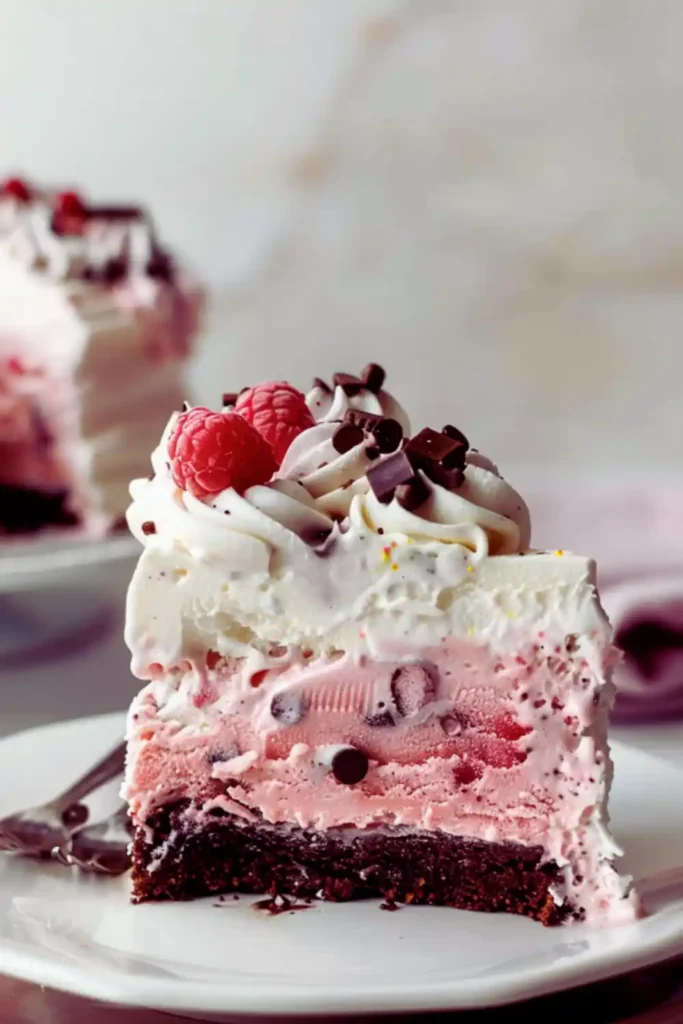
Layer 1 – Bottom Ice Cream Layer
Soften one carton of ice cream slightly (about 5–10 minutes at room temperature) to make it easier to spread. Spoon the softened ice cream into the prepared pan and use a spatula to spread it evenly across the bottom. Freeze for 30 minutes to set before adding the next layer. This ensures stability and prevents mixing between layers.
Layer 2 – Hot Fudge & Cookie Crunch
Spread a generous layer of homemade hot fudge over the first ice cream layer, leaving a small border around the edges. Crush your chosen cookies (e.g., Oreos or graham crackers) and mix them with melted butter for added texture. Sprinkle the cookie mixture evenly over the fudge layer, pressing lightly to adhere. Freeze for another 30 minutes to firm up.
Layer 3 – Top Ice Cream Layer
Repeat the process with the second carton of ice cream, softening it slightly before spreading it evenly over the cookie layer. Smooth the top with a spatula and freeze the entire cake for at least 12 hours, or overnight, to ensure it’s fully set and easy to slice.
Finishing Touches – Whipped Cream & Garnish
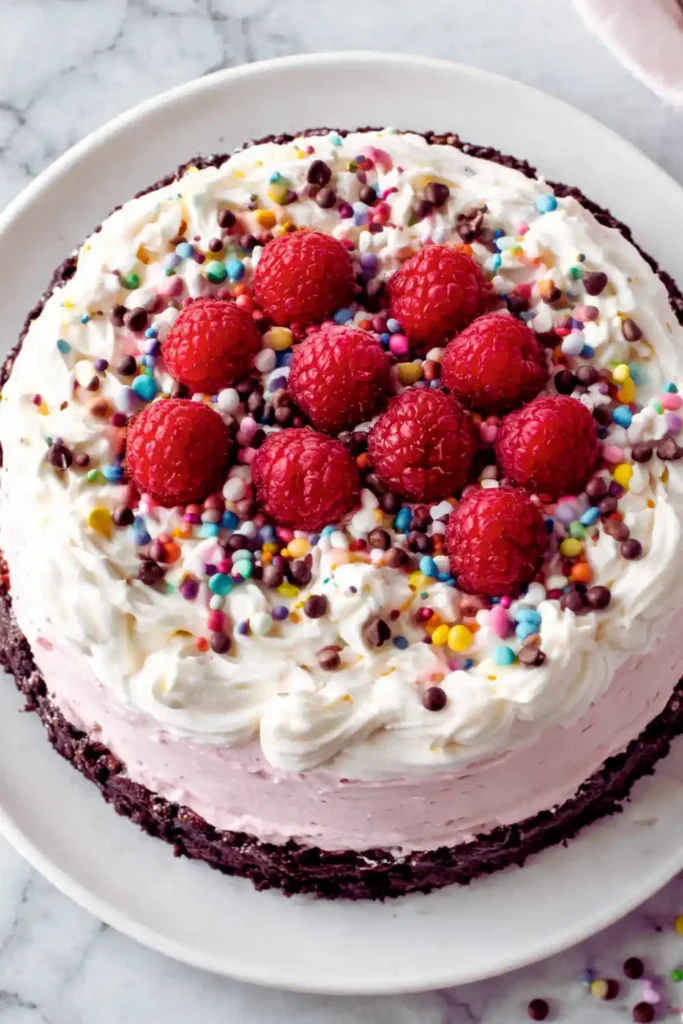
Whip heavy cream with confectioners’ sugar and vanilla extract until stiff peaks form. Frost the frozen cake quickly to prevent melting, smoothing the whipped cream evenly over the top and sides. Add sprinkles, chocolate shavings, or decorative piping for a festive touch. Return the cake to the freezer until ready to serve.
Expert Tips for Success
For the best results, work quickly to prevent melting during assembly. Freeze the serving plate or cutting board beforehand to keep the cake intact while slicing. Use a hot knife dipped in warm water for clean, smooth cuts. If preparing ahead, cover the cake tightly with plastic wrap and store it in the freezer for up to 48 hours. These expert tips guarantee a no-bake dessert that’s consistently impressive and delicious.
Flavor Combinations to Try
Experiment with classic combinations like chocolate + strawberry, peanut butter + chocolate, or cookies and cream + mint chip. For unique twists, try coffee + caramel, lemon sorbet + shortbread cookies, or dulce de leche + banana ice cream. The possibilities are endless, making this customizable ice cream cake a canvas for creativity.
Nutritional Information (Optional)
A typical slice of ice cream cake contains approximately 300–400 calories, depending on the ingredients used. To lighten the recipe, opt for low-fat ice cream, reduced-sugar whipped cream, and minimal garnishes. This flexibility allows you to enjoy a decadent dessert without compromising dietary goals.
Serving Suggestions for Your Ice Cream Cake
Enhance your ice cream cake experience with creative serving ideas that elevate its presentation and flavor. Pair slices with fresh berries, a drizzle of extra hot fudge, or a dusting of cocoa powder for an elegant touch. This dessert is perfect for celebrations like birthdays, BBQs, or holiday gatherings, where its customizable nature makes it a standout treat. Whether you’re garnishing with sprinkles or adding a side of whipped cream, these how to serve ice cream cake tips ensure a memorable presentation. Impress your guests with these ice cream cake presentation ideas and make every occasion special.
Storage Tips to Keep Your Ice Cream Cake Fresh
To keep your ice cream cake tasting fresh, store leftovers properly by covering the cake tightly with plastic wrap or foil. Place it in the freezer to maintain its texture and flavor. Prevent freezer burn by ensuring the cake is well-sealed and avoiding temperature fluctuations. For best results, consume within 1–2 weeks. These how to store ice cream cake techniques ensure your dessert remains as delicious as the day it was made. Planning ahead? Use these freezing ice cream cake for later tips to enjoy it anytime without compromising quality.
See Also:
FAQs About Making Ice Cream Cake
Q: Can I use a baked cake layer instead of ice cream?
A: Yes, consider using a vanilla or chocolate cake base for added texture.
Q: What if I don’t have a springform pan?
A: Use a 9×13-inch pan or halve the recipe for smaller sizes.
Q: Can I substitute Oreos with other cookies?
A: Absolutely! Try graham crackers, Biscoff cookies, or shortbread.
Q: How far in advance can I make this cake?
A: Prepare up to 48 hours ahead; store in the freezer until ready to serve.
Why This Ice Cream Cake Will Be Your Go-To Dessert
This ice cream cake recipe combines simplicity, customization potential, and wow factor into one unforgettable dessert. Whether you’re celebrating a special occasion or simply craving something sweet, this no-bake dessert delivers every time. Experiment with flavors, toppings, and presentations to make it your own. Share your creations with friends and family, and watch as this becomes your go-to dessert for any occasion!
Print
How to Make the Ultimate Ice Cream Cake (Customizable, No-Bake, and Irresistible!)
- Total Time: 13 hours (including freezing time)
- Yield: 8–12 servings
- Diet: Vegetarian
Description
Customizable ice cream cake is a no-bake dessert featuring layers of your favorite ice cream flavors, hot fudge, cookie crunch, and whipped cream. Perfect for birthdays, holidays, or casual gatherings. Easily customized with endless flavor combinations.
Ingredients
For the Cake:
– 2 cartons (1.5 quarts each) of ice cream (choose complementary flavors like chocolate and strawberry)
– 2 cups crushed cookies (e.g., Oreos, Nutter Butters, graham crackers, or alternatives)
– 2 tbsp melted butter (optional, for cookie layer)
– 1 cup hot fudge (homemade or store-bought)
For the Whipped Cream Topping:
– 2 cups heavy whipping cream
– ¼ cup confectioners’ sugar
– 1 tsp vanilla extract
For Garnish (optional):
– Sprinkles
– Chocolate shavings
– Fresh fruit
Instructions
- Prep the Pan: Line a 9×3-inch or 10×3-inch springform pan with plastic wrap, ensuring it hangs over the edges for easy release. Work in a cool environment to prevent melting.
- Layer 1 – Bottom Ice Cream Layer: Soften one carton of ice cream slightly (about 5–10 minutes at room temperature). Spoon it into the prepared pan and spread evenly with a spatula. Freeze for 30 minutes to set.
- Layer 2 – Hot Fudge & Cookie Crunch: Spread a generous layer of hot fudge over the first ice cream layer, leaving a small border around the edges. Crush cookies and mix with melted butter for added texture. Sprinkle the cookie mixture evenly over the fudge layer, pressing lightly to adhere. Freeze for another 30 minutes.
- Layer 3 – Top Ice Cream Layer: Repeat the process with the second carton of ice cream, softening it slightly before spreading it evenly over the cookie layer. Smooth the top with a spatula. Freeze the entire cake for at least 12 hours, or overnight, to fully set.
- Whipped Cream Topping: Whip heavy cream, confectioners’ sugar, and vanilla extract with an electric mixer until stiff peaks form. Frost the frozen cake quickly to prevent melting, smoothing the whipped cream evenly over the top and sides.
- Garnish: Add sprinkles, chocolate shavings, or fresh fruit for decoration. Return the cake to the freezer until ready to serve.
Notes
– Work Quickly: Prevent melting by assembling the cake in a cool environment and freezing between layers.
– Freeze Serving Tools: Chill the serving plate or cutting board beforehand to keep the cake intact while slicing. Use a hot knife dipped in warm water for clean cuts.
– Storage: Store leftovers in the freezer, tightly covered with plastic wrap, for up to 48 hours.
– Customizations: Experiment with flavor combinations like peanut butter + chocolate, cookies and cream + mint chip, or coffee + caramel. Substitute cookies or toppings based on preference.
- Prep Time: 30 minutes
- Cook Time: 0 minutes (no-bake)
- Category: Dessert / Cake
- Method: No-Bake
- Cuisine: American
Nutrition
- Serving Size: 1 slice (based on 10 slices per cake)
- Calories: ~350
- Sugar: 30g
- Sodium: 150mg
- Fat: 20g
- Saturated Fat: 12g
- Unsaturated Fat: 7g
- Trans Fat: 0g
- Carbohydrates: 35g
- Fiber: 1g
- Protein: 5g
- Cholesterol: 60mg
